In our previous article, we discussed using Python with boto3 library to perform read-write ops in MinIO buckets. In this final installment of Hello MinIO series, we are going to talk about running Spark jobs in docker and performing reading-writing data with MinIO bucket. This demo could be used as a stepping stone for building your own data platform in your own localhost. So without further ado, let us get to it.
In this exercise, we will use some of the functions to push sample_data.csv to the MinIO bucket test-bucket-1 using the python codes from previous article. Once we have data available in the MinIO bucket, we will try to read the same data as spark dataframe, do some transforations to it and write it back to some other location in test-bucket-1. Once, the data is written back to MinIO bucket, we will read it again to double check working of our spark job.
To perform this exercise, we are going to create/mdify following files:
try_minio_with_pyspark.py: code for performing PySpark based transformationsDockerfile.etl: modify file to packagetry_minio_with_pyspark.pyin theetlimagedocker-compose.yml: modify to add spark master and worker service
1. Create try_minio_with_pyspark.py file
Lets break the objectines of this ETL into bite-size functions to keep the code modular and maintain readability.
As seen earlier, MinIO lets you interact with it's bucket via various s3 protocols. Therefore, we are going to write a function to create
SparkSessionobject withs3aconfigurations. The code is:# Set your MinIO credentials and endpoint minio_access_key = 'minioaccesskey' minio_secret_key = 'miniosecretkey' minio_endpoint = 'http://minio-server:9000' minio_bucket = "test-bucket-1" minio_sample_file_path = "sample/sample_data.csv" # Function to get SparkSession object def get_spark(): # Create a Spark session spark = SparkSession.builder \ .appName("MinIO PySpark Example") \ .master("spark://spark-master:7077") \ .getOrCreate() # Set the S3A configuration for MinIO spark.sparkContext._jsc.hadoopConfiguration().set("fs.s3a.access.key", os.getenv("AWS_ACCESS_KEY_ID", minio_access_key)) spark.sparkContext._jsc.hadoopConfiguration().set("fs.s3a.secret.key", os.getenv("AWS_SECRET_ACCESS_KEY", minio_secret_key)) spark.sparkContext._jsc.hadoopConfiguration().set("fs.s3a.endpoint", os.getenv("ENDPOINT", minio_endpoint)) spark.sparkContext._jsc.hadoopConfiguration().set("fs.s3a.connection.ssl.enabled", "true") spark.sparkContext._jsc.hadoopConfiguration().set("fs.s3a.path.style.access", "true") spark.sparkContext._jsc.hadoopConfiguration().set("fs.s3a.attempts.maximum", "1") spark.sparkContext._jsc.hadoopConfiguration().set("fs.s3a.connection.establish.timeout", "5000") spark.sparkContext._jsc.hadoopConfiguration().set("fs.s3a.connection.timeout", "10000") spark.sparkContext.setLogLevel("WARN") return sparkPut the
sample_data.csvto the MinIO buckettest-bucket-1:import sys sys.path.append('.') # Reuse functions from our previous demo from try_minio_with_python import * bucket_name = "test-bucket-1" object_orig_path = "sample/sample_data.csv" object_target_path = "sample1/" # 1. Create MinIO bucket if not exists create_minio_bucket(bucket_name) # 2. Upload to MinIO # Note: we copied our sample data (local) /opt/sample_data/sample_data.csv in Dockerfile.etl upload_to_s3('/opt/sample_data/sample_data.csv', bucket_name, object_orig_path)Let's create a function to read data from s3 bucket as dataframe and then read the
sample_data.csvas pyspark dataframe:# Create dataframe on S3 object def read_csv_as_dataframe(path, schema): spark = get_spark() df = spark.read.csv(path, header=False, schema=schema) return df # Schema for our sample_data.csv schema = StructType([ StructField("id", IntegerType(), True), StructField("name", StringType(), True), StructField("salary", IntegerType(), True) ]) # Reading the file as dataframe path = f"s3a://{bucket_name}/{object_orig_path}" df1 = read_csv_as_dataframe(path, schema) df1.show(20, False)Transform data (add a dummy column) and write it to some other location on MinIO bucket. Let's write a function for it:
# Write data to S3 def write_to_s3(df, path, mode): df.write.format("parquet").mode(mode).save(output_dir) # Transform the data df2 = df1.withColumn("Flag", lit("df2")) output_path = f"s3a://{bucket_name}/{object_target_path}" df2.show(20, False) # Write data to S3 bucket write_to_s3(df2, output_path, "overwrite")Read the data from the new object location om MinIO bucket to confirm that write op was good:
# Read from the target location df3 = get_spark().read.parquet(output_path) df3.show(20, False)
And with this, we have completed all of the objectives of this exercise. Let us put it all together as one python script:
import os
import sys
sys.path.append('.')
# Reuse functions from our previous demo
from try_minio_with_python import create_minio_bucket
# PySpark related imports
from pyspark.sql import SparkSession
from pyspark.sql.types import StructType, StructField, StringType, IntegerType
from pyspark.sql.functions import lit
 # Set your MinIO credentials and endpoint
 minio_access_key = 'minioaccesskey'
 minio_secret_key = 'miniosecretkey'
 minio_endpoint = 'http://minio-server:9000'
 minio_bucket = "test-bucket-1"
 minio_sample_file_path = "sample/sample_data.csv"

 # Function to get SparkSession object
 def get_spark():
     # Create a Spark session
     spark = SparkSession.builder \
         .appName("MinIO PySpark Example") \
         .master("spark://spark-master:7077") \
         .getOrCreate()

     # Set the S3A configuration for MinIO
     spark.sparkContext._jsc.hadoopConfiguration().set("fs.s3a.access.key", os.getenv("AWS_ACCESS_KEY_ID", minio_access_key))
     spark.sparkContext._jsc.hadoopConfiguration().set("fs.s3a.secret.key", os.getenv("AWS_SECRET_ACCESS_KEY", minio_secret_key))
     spark.sparkContext._jsc.hadoopConfiguration().set("fs.s3a.endpoint", os.getenv("ENDPOINT", minio_endpoint))
     spark.sparkContext._jsc.hadoopConfiguration().set("fs.s3a.connection.ssl.enabled", "true")
     spark.sparkContext._jsc.hadoopConfiguration().set("fs.s3a.path.style.access", "true")
     spark.sparkContext._jsc.hadoopConfiguration().set("fs.s3a.attempts.maximum", "1")
     spark.sparkContext._jsc.hadoopConfiguration().set("fs.s3a.connection.establish.timeout", "5000")
     spark.sparkContext._jsc.hadoopConfiguration().set("fs.s3a.connection.timeout", "10000")

     spark.sparkContext.setLogLevel("WARN")
     return spark
# Create dataframe on S3 object
def read_csv_as_dataframe(path, schema):
spark = get_spark()
df = spark.read.csv(path, header=False, schema=schema)
return df
# Write data to S3
def write_to_s3(df, path, mode):
df.write.format("parquet").mode(mode).save(path)
# MinIO Bucket and source-destination paths
bucket_name = "test-bucket-1"
object_orig_path = "sample/sample_data.csv"
object_target_path = "sample1/"
# Step-1: Loading data
# 1. Create MinIO bucket if not exists
create_minio_bucket(bucket_name)
# 2. Upload to MinIO
# Note: we copied our sample data (local) /opt/sample_data/sample_data.csv in Dockerfile.etl
upload_to_s3('/opt/sample_data/sample_data.csv', bucket_name, object_orig_path)
# Step-2: Read data as dataframe
# Schema for our sample_data.csv
schema = StructType([
StructField("id", IntegerType(), True),
StructField("name", StringType(), True),
StructField("salary", IntegerType(), True)
])
# Reading the file as dataframe
path = f"s3a://{bucket_name}/{object_orig_path}"
df1 = read_csv_as_dataframe(path, schema)
df1.show(20, False)
# Step-3: Transform and write back to S3
# Transform the data
df2 = df1.withColumn("Flag", lit("df2"))
output_path = f"s3a://{bucket_name}/{object_target_path}"
df2.show(20, False)
# Write data to S3 bucket
write_to_s3(df2, output_path, "overwrite")
# Step-4: Read from where we wrote data above to confirm
 # Read from the target location
 df3 = get_spark().read.parquet(output_path)
 df3.show(20, False)
# Step-5: Close SparkSession
get_spark().stop()
2. Modify Dockerfile.etl file
We need to modify the Dockerfile.etl to ship the try_minio_with_pyspark.py file and set permissions. Please ensure your Dockerfile.etl file looks like this:
FROM python:3.11

# Adding JDK - Required for PySpark
COPY --from=openjdk:8-jre-slim /usr/local/openjdk-8 /usr/local/openjdk-8
ENV JAVA_HOME /usr/local/openjdk-8
RUN update-alternatives --install /usr/bin/java java /usr/local/openjdk-8/bin/java 1

# Adding general shell commands
# Useful for debugging the container
RUN apt-get update && apt-get install -y wget vim cron
RUN echo "alias ll='ls -lrt'" >> ~/.bashrc

WORKDIR /opt/

# Install python libraries
RUN pip install poetry pyspark boto3
COPY pyproject.toml /opt/pyproject.toml
RUN poetry install

# Copying our read/write code
COPY try_minio_with_python.py try_minio_with_python.py
COPY try_minio_with_pyspark.py try_minio_with_pyspark.py

COPY try_minio_with_pyspark.py try_minio_with_pyspark.py
RUN chmod +x /opt/try_minio_with_pyspark.py

# Adding sample data in container's local storage
RUN mkdir -p /opt/sample_data/
COPY sample_data.csv /opt/sample_data/
RUN chmod 777 /opt/sample_data/sample_data.csv

# Get JAR for Spark-S3 integration
RUN wget https://repo1.maven.org/maven2/org/apache/hadoop/hadoop-aws/3.3.4/hadoop-aws-3.3.4.jar
RUN wget https://repo1.maven.org/maven2/com/amazonaws/aws-java-sdk-bundle/1.12.540/aws-java-sdk-bundle-1.12.540.jar
Please note that we have also downloaded necessary jar files (hadoop-aws-3.3.4.jar and aws-java-sdk-bundle-1.12.540.jar) so that spark could connect to MinIO bucket via s3a protocol.
3. Modify docker-compose.yml file
We need to specify this file to specify:
the spark cluster configurations in
docker-compose.ymlfile so that we have a cluster to perform ETL onadd spark service as dependency for the ETL
Below is the revised version of the docker-compose.yml file:
version: '3'

services:
  minio:
    image: minio/minio
    platform: linux/arm64
    container_name: minio-server
    ports:
      - "9000:9000"
      - "9090:9090"
    environment:
      MINIO_ACCESS_KEY: minioaccesskey
      MINIO_SECRET_KEY: miniosecretkey
    volumes:
      - /Users/kumarrohit/blogging/minio/data:/data
    command: server /data --console-address ":9090"

  spark-master:
    image: bitnami/spark:3.5.0
    container_name: spark-master
    environment:
      SPARK_MODE: master
      SPARK_MASTER_WEBUI_PORT: 9080
      SPARK_MASTER_PORT: 7077
    ports:
      - "9080:9080"
      - "7077:7077"
    deploy:
      resources:
        limits:
          memory: 2G

  spark-worker:
    image: bitnami/spark:3.5.0
    container_name: spark-worker
    environment:
      SPARK_MODE: worker
      SPARK_WORKER_WEBUI_PORT: 8081
      SPARK_WORKER_MEMORY: 3G
      SPARK_WORKER_CORES: 2
      SPARK_MASTER_URL: spark://spark-master:7077
    depends_on:
      - spark-master
  etl:
    build:
      context: .
      dockerfile: Dockerfile.etl
    container_name: etl
    environment:
      - PYTHONUNBUFFERED=1
    depends_on:
      - minio
      - spark-master
      - spark-worker
4. Rebuild the minio-etl image
Default docker image naming convension (for custom services defined in docker-compose.yml file) is pretty straight forward - <current_directory>-<service_name>. We are going to remove the old image and create a new one because the old image does not contain the try_minio_with_pyspark.py file yet! We will delete the old etl service image.
List down your docker images using command:
docker images
You should see below output:
REPOSITORY      TAG          IMAGE ID       CREATED        SIZE
minio-etl       latest       2c81890887f1   43 hours ago   4GB
minio/minio     latest       ec8b8bbea970   6 weeks ago    147MB
We need to remove the minio-etl image, because it doesn't contain try_spark_with_pyspark.py yet. In my case, the IMAGE ID is 2c81890887f1. I am going to use the same to remove the image by hitting:
docker image rm -f 2c81890887f1
It will give below output:
Untagged: minio-etl:latest
Deleted: sha256:2c81890887f1d080b46625f3282fd570e1555680a6107e7c3fd31db3cca815ed
5. Starting your Spark Cluster
Let us start spark-master and spark-worker service instances by running command:
docker compose up -d spark-master spark-worker
Once again, if you are running spark service instances for the first time in docker, it would take longer as docker will pull spark images from docker-hub. Once images are pulled and instances are created, you should see below output:
[+] Running 2/2
 ✔ Container spark-master  Started                                     0.0s
 ✔ Container spark-worker  Started                                     0.0s
6. Finally, running the ETL
Now that all the dependencies are resolved, let us trigger our ETL using the docker compose run command:
docker compose run -it etl spark-submit --jars aws-java-sdk-bundle-1.12.540.jar,hadoop-aws-3.3.4.jar /opt/try_minio_with_pyspark.py
Please note that:
Since we deleted the
minio-etlimage in above steps, hence, before actually runningdocker run, docker will build the image first.We have specified the jar file (
aws-java-sdk-bundle-1.12.540.jar,hadoop-aws-3.3.4.jar) to be downloaded in ourDockerfile.etlfile. These are dependencies for spark-s3 integration.the source-destination path for our data on
test-bucket-1:# MinIO Bucket and source-destination paths bucket_name = "test-bucket-1" object_orig_path = "sample/sample_data.csv" object_target_path = "sample1/"
Once the image build complets, your spark ETL will start executing and you should see below output in your terminal:
docker compose run -it etl spark-submit --jars aws-java-sdk-bundle-1.12.540.jar,hadoop-aws-3.3.4.jar /opt/try_minio_with_pyspark.py
[+] Creating 3/0
 ✔ Container minio-server  Running                                                                                                                                                                                                                                         0.0s
 ✔ Container spark-master  Running                                                                                                                                                                                                                                         0.0s
 ✔ Container spark-worker  Running                                                                                                                                                                                                                                         0.0s
[+] Building 954.2s (25/25) FINISHED                                                                                                                                                                                                                       docker:desktop-linux
 => [etl internal] load .dockerignore                                                                                                                                                                                                                                      0.0s
 => => transferring context: 2B                                                                                                                                                                                                                                            0.0s
 => [etl internal] load build definition from Dockerfile.etl                                                                                                                                                                                                               0.0s
 => => transferring dockerfile: 1.30kB                                                                                                                                                                                                                                     0.0s
 => [etl internal] load metadata for docker.io/library/openjdk:8-jre-slim                                                                                                                                                                                                  1.3s
 => [etl internal] load metadata for docker.io/library/python:3.11                                                                                                                                                                                                         1.3s
 => [etl] FROM docker.io/library/openjdk:8-jre-slim@sha256:53186129237fbb8bc0a12dd36da6761f4c7a2a20233c20d4eb0d497e4045a4f5                                                                                                                                                0.0s
 . . .
 . . .
 . . .
24/02/08 14:59:49 INFO BlockManager: Initialized BlockManager: BlockManagerId(driver, dc5fb16acd06, 35253, None)
24/02/08 14:59:49 INFO StandaloneAppClient$ClientEndpoint: Executor updated: app-20240208145949-0004/0 is now RUNNING
24/02/08 14:59:49 INFO StandaloneSchedulerBackend: SchedulerBackend is ready for scheduling beginning after reached minRegisteredResourcesRatio: 0.0
24/02/08 14:59:50 WARN MetricsConfig: Cannot locate configuration: tried hadoop-metrics2-s3a-file-system.properties,hadoop-metrics2.properties
+---+----+------+
|id |name|salary|
+---+----+------+
|1  |A   |100   |
|2  |B   |200   |
|3  |C   |300   |
+---+----+------+

+---+----+------+----+
|id |name|salary|Flag|
+---+----+------+----+
|1  |A   |100   |df2 |
|2  |B   |200   |df2 |
|3  |C   |300   |df2 |
+---+----+------+----+

+---+----+------+----+
|id |name|salary|Flag|
+---+----+------+----+
|1  |A   |100   |df2 |
|2  |B   |200   |df2 |
|3  |C   |300   |df2 |
+---+----+------+----+
If you observe carefully, first table output is from df1 when we read the file sample_data.csv from the MinIO bucket test-bucket-1/sample1/. Second table output is when we did df2.show(20, False) after applying transformations, and third table output is from the dataframe df3, which we created on the directory where we wrote df2.
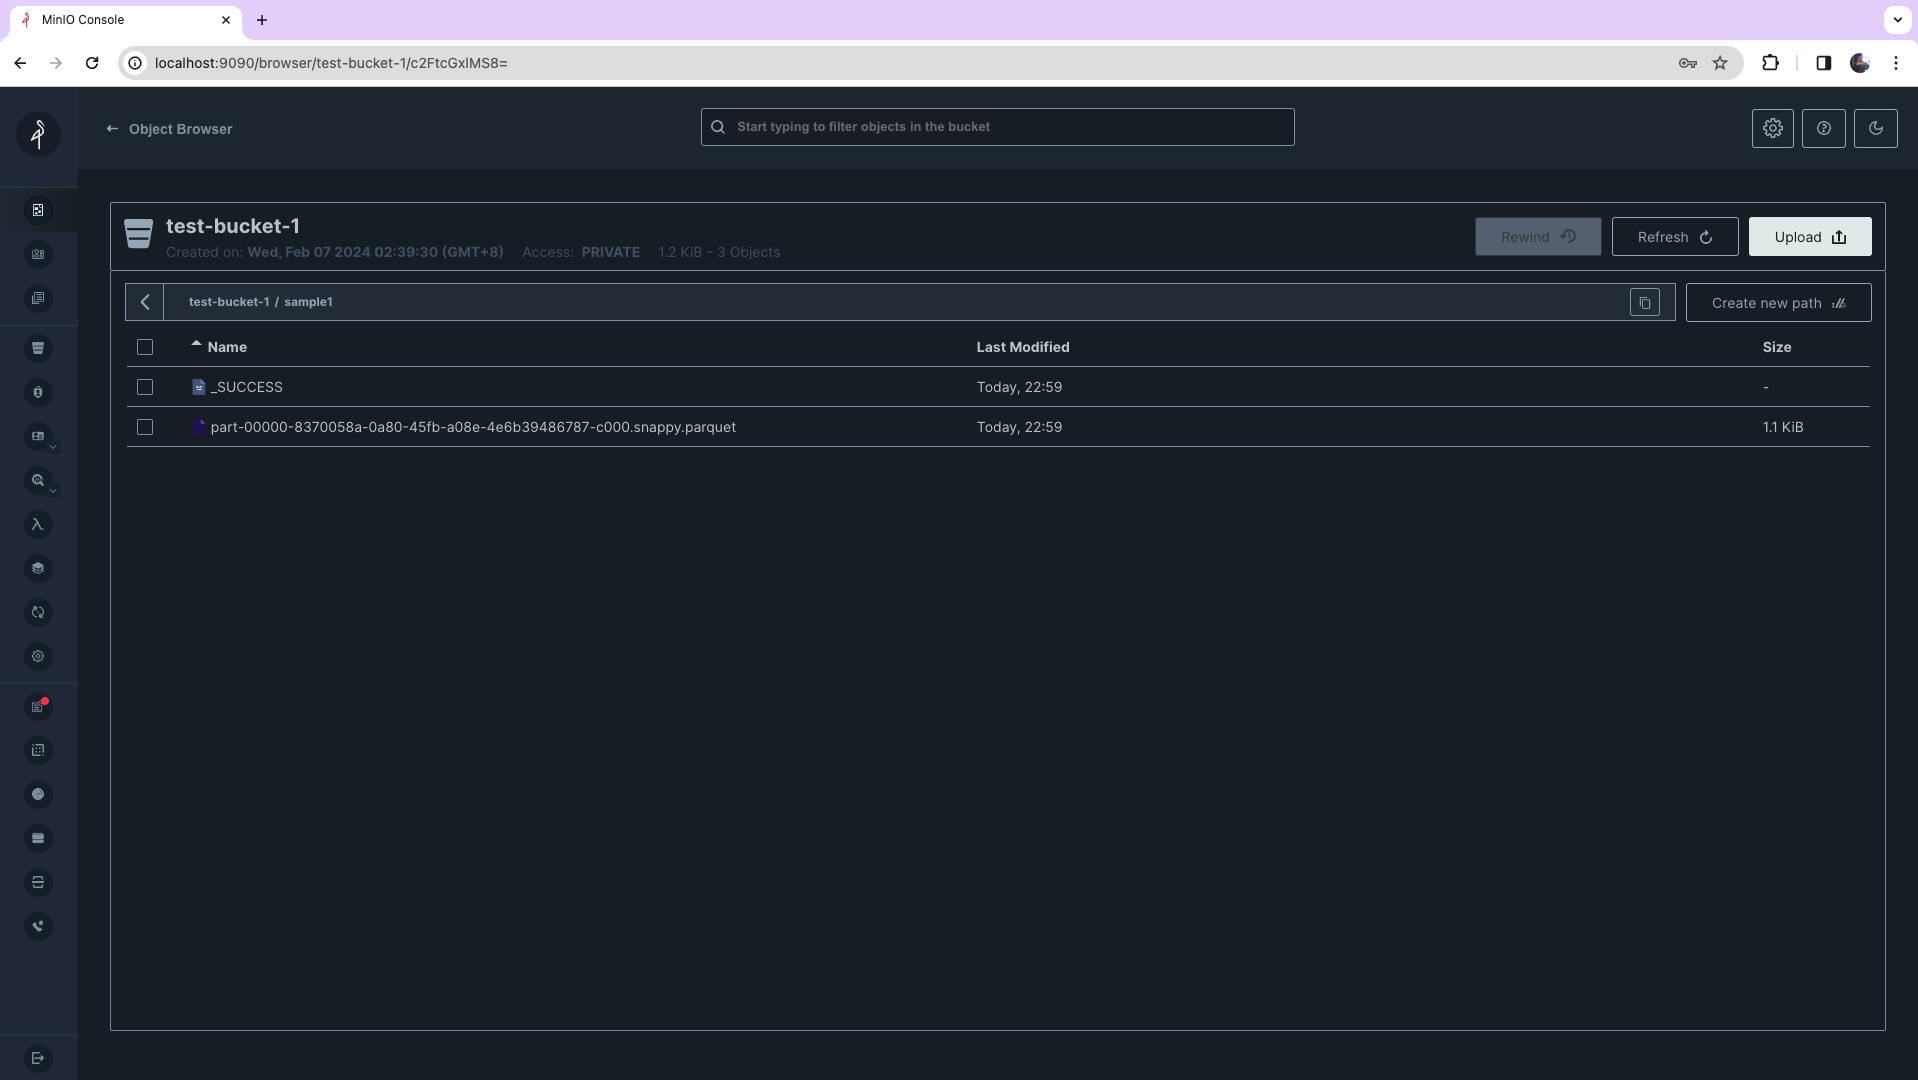
You can also check the newly written data in MinIO Object Browser portal by going to http://localhost:9090/browser

Summary
With this, we conclude the last installment of our Hello MinIO series. You can find all of the project related artifacts in my GitHub. Thank you for reading till the end, I hope it was worthwhile. MinIO is exciting, you can build your own datalake/deltalake in your localhost! What we did here is just the tip of the iceberg, and possibilities are endless!
Next, we will be building more cool projects and I will share all my learnings with you.
Until then, cheers!
